Mesird
UITableView overview
UITableView is a very powerful list view provided by Apple, basically every single app on App Store use this widget to create a list of things in one page.
As a very frequently used view in iOS, we must know how to initialize, configure and display it in the correct way. In this passage, I will introduce the simple and advanced usage of UITableView which can help you to develop better.
Basic usage
Initialization
UITableView *tableView = [[UITableView alloc] initWithFrame:frame style:style];
TableView has two types of style, UITableViewStylePlain and UITableViewStyleGrouped, there are several differences between them, the most obvious distinction is on displaying.

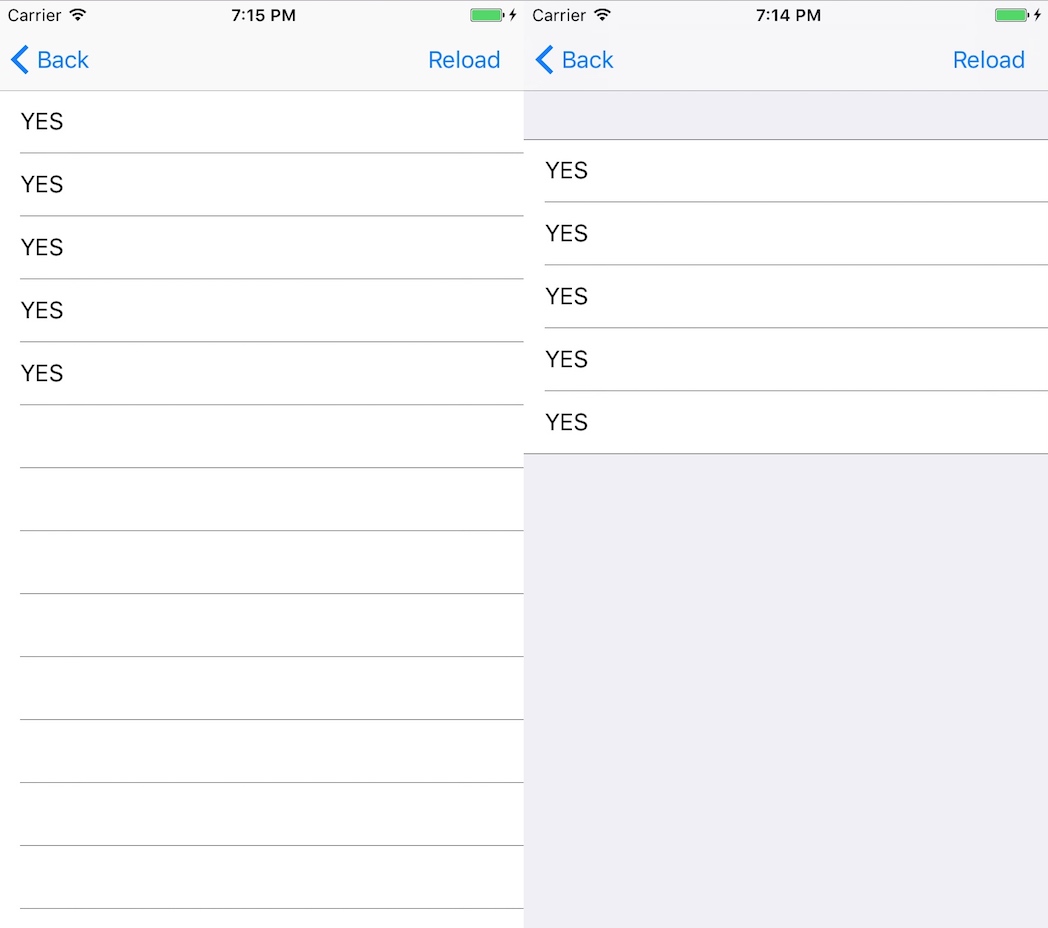
In Plain style, table view’s default background color is clear color, extra rows are shown with blank and separated by separator line, and there is no header or footer displayed if you do not configure.
However in Grouped style, table view has default background color which is #EFEFF4, no extra rows will be shown and every section has default header and footer.
Hint if you want to hide all extra rows in Plain style, you can simply set tableView’s footer a blank UIView.
tableView.tableFooterView = [UIView new];
There are some other differences, we will talk later on.
Configuration
UITableView needs a data source to know how many sections the tableview has and how many rows it has in the specified section. Also, there are lots of information that we need to provide to let table view know how to construct itself. Thus we need to assign UITableViewDelegate and UITableViewDataSource to table view.
Normally, we set the current view controller as table view’s dataSource and delegate, and implement some protocol methods in it.
@interface MyViewController <UITableViewDataSource, UITableViewDelegate>
...
tableView.dataSource = self;
tableView.delegate   = self;
Or you can simply set in storyboard by dragging dataSource and delegate’s outlets to File Owner.

Two methods in UITableViewDataSource are required to implement:
// How many rows the specified section contains
- (NSInteger)tableView:(UITableView *)tableView numberOfRowsInSection:(NSInteger)section;
// What view does every row has
- (UITableViewCell *)tableView:(UITableView *)tableView cellForRowAtIndexPath:(NSIndexPath *)indexPath;
It is important to notify the table view what view should every row display.
And this view, we typically name it Cell, could be a predefined style or a customized style, has many functions and is the most important element in a table view.
An index path define the position of each cell, it much easier to locate.
@interface NSIndexPath (UITableView)
+ (instancetype)indexPathForRow:(NSInteger)row inSection:(NSInteger)section;
@property (nonatomic, readonly) NSInteger section;
@property (nonatomic, readonly) NSInteger row;
@end
Well, if you know a little about memory, you may ask ‘what if there are a large number of rows I need to display, will table view create the same number of cells?’. Good question. Provided that if a batch of cells are created, there must be a lot of memory cost. So, Apple has a very elegant mechanism about how to reuse every cell.
Cell Identifier - a unique symbol for every reused cell. UITableView has two methods to get a UITableViewCell instance with a cell identifier,
- (nullable __kindof UITableViewCell *)dequeueReusableCellWithIdentifier:(NSString *)identifier;
- (__kindof UITableViewCell *)dequeueReusableCellWithIdentifier:(NSString *)identifier forIndexPath:(NSIndexPath *)indexPath NS_AVAILABLE_IOS(6_0);
All cells are stored in a queue or list for the later use. As soon as the table view is initialized, the cells which will be displayed on screen (visible cells) are generated by calling delegate method(tableView:cellForRowAtIndexPath:).
Both of the two methods can return a cell by searching the associated identifier in the queue or list. If no cell is found in it, the table view will create a cell.
- (void)registerNib:(nullable UINib *)nib forCellReuseIdentifier:(NSString *)identifier NS_AVAILABLE_IOS(5_0);
- (void)registerClass:(nullable Class)cellClass forCellReuseIdentifier:(NSString *)identifier NS_AVAILABLE_IOS(6_0);
There are two types of creation, one is nib, another is class. You need to register one of them after initializing table view, cause these nibs or classes are used to create associated cells if the reuse queue does not contain the cell with the specified identifier.
Notice that dequeueReusableCellWithIdentifier: returns nil if the identifier was not registered, while dequeueReusableCellWithIdentifier:forIndexPath: method will raise an exception.
Hint : If you create a table view and table view cell in storyboard, you do not need to register the cell, cause IB (interface builder) will automatically create a nib and register while table view is loading.
If table view registers a nib,
initWithCoder:will be called to create a cell, whileinitWithStyle:reuseIdentifier:is called if table view registers a class.
Until now, a table view can displayed with above configurations, there are still some other methods to help table view work well.
Interaction
When we want to interact with a specified row, like tap, swipe or any thing else, we need to implement associated methods.
- (NSIndexPath *)tableView:(UITableView *)tableView willSelectRowAtIndexPath:(NSIndexPath *)indexPath;
- (void)tableView:(UITableView *)tableView didSelectRowAtIndexPath:(NSIndexPath *)indexPath;
- (NSIndexPath *)tableView:(UITableView *)tableView willDeselectRowAtIndexPath:(NSIndexPath *)indexPath;
- (void)tableView:(UITableView *)tableView didDeselectRowAtIndexPath:(NSIndexPath *)indexPath;
When a cell is selected or deselected, the related methods will be invoked. You can implement your custom operations in each method to achieve some purposes.
selection style
Normally, a cell has the default selection style (UITableViewCellSelectionStyleGray), and you can set no selection style using following code.
cell.selectionStyle = UITableViewCellSelectionStyleNone;
Then you can also set your custom selection style in classes inherited from UITableViewCell by overriding setSelected:animated: method. A concise demo like below:
- (void)setSelected:(BOOL)selected animated:(BOOL)animated {
    [super setSelected:selected animated:animated];

    // Configure the view for the selected state
    if (selected) {
        self.accessoryType = UITableViewCellAccessoryCheckmark;
    } else {
        self.accessoryType = UITableViewCellAccessoryNone;
    }
}
UITableView has single selection mode, which is default mode, and it supports multi-selection mode as well, just simply set the table view allows multi-selection.
tableView.allowsMultiSelection = YES;
editing
Sometimes we want to delete a row in a config list, we would swipe left to see more menus and tap on delete button. While sometimes we want to reorder a row, we would tap on edit bar button item on the right-top of screen.
We need to implement few methods to achieve it, cause a default table view does not have these two functions.
- (BOOL)tableView:(UITableView *)tableView canEditRowAtIndexPath:(NSIndexPath *)indexPath;
- (BOOL)tableView:(UITableView *)tableView canMoveRowAtIndexPath:(NSIndexPath *)indexPath;
To return YES at which the specified indexPath need to own the ability of deletion and movement. Then tell the table view what kind of edit actions the specified row need to have by implement the following method:
- (NSArray<UITableViewRowAction *> *)tableView:(UITableView *)tableView editActionsForRowAtIndexPath:(NSIndexPath *)indexPath {

    __weak typeof(self) weakSelf = self;
    UITableViewRowAction *removeAction = [UITableViewRowAction rowActionWithStyle:UITableViewRowActionStyleNormal title:@"Remove" handler:^(UITableViewRowAction * _Nonnull action, NSIndexPath * _Nonnull indexPath) {
        [weakSelf.items removeObjectAtIndex:indexPath.row];
        [weakSelf.tableView deleteRowsAtIndexPaths:@[indexPath] withRowAnimation:UITableViewRowAnimationAutomatic];
    }];

    return @[removeAction];
}
Notice that this method is available after iOS 8.0. The return value is a UITableViewRowAction array, and each row action is bound with a handler block. The block will be executed when you tap on the menu button.
Hint : Before you make any modification on table view, like insertion, deletion or movement, you have to modify the data source(array or anything else) first! Otherwise, table view will probably raise an exception if the model and view are not matched. Like the above code, I remove the object from the item array before executing delete code to table view.
UITableView has a editing variable to determine the editing state, and default it’s NO. Whenever you want to make any editing action on the whole table view, set this variable to YES. Enclosing by beginUpdates and endUpdates you will get an animation.

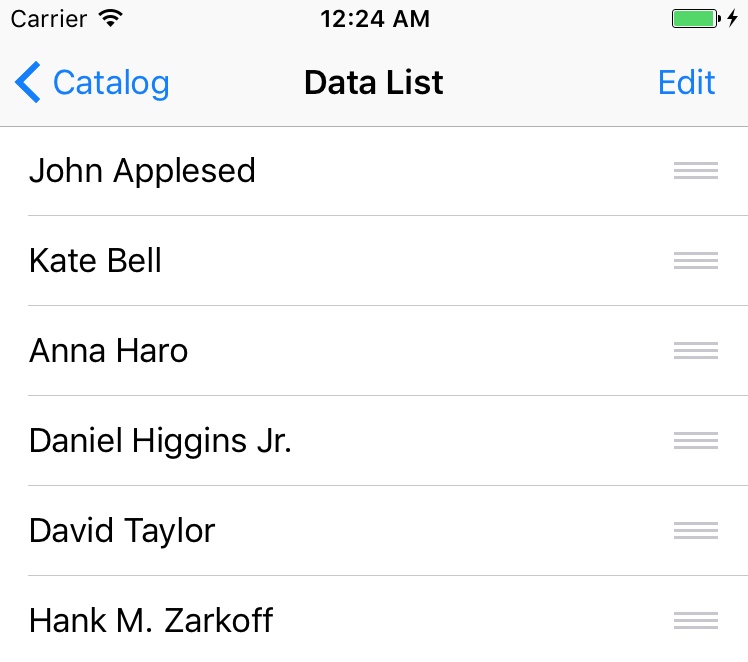
If you just want the reorder function, that is to say just display reorder hamburger button on the right and without delete circle button on the left, you need to implement the following method:
- (BOOL)tableView:(UITableView *)tableView shouldIndentWhileEditingRowAtIndexPath:(NSIndexPath *)indexPath {
    return NO;
}
- (UITableViewCellEditingStyle)tableView:(UITableView *)tableView editingStyleForRowAtIndexPath:(NSIndexPath *)indexPath {
    return UITableViewCellEditingStyleNone;
}
The first one notify table view that you do not need indent while it’s in editing mode, and the second one tells table view you do not need any editing style on the specified row. Quite easy, right? It would look like this.

menu
We’ve all seen a cut/copy/paste menu when we made a tap-hold at somewhere, and perhaps you have known how to create such a menu on other controls like UILabel or UITextView. It is also worked in UITableView by tap-holding on a certain row.

As the picture above shows, there are three items on the menu - Cut, Copy and Paste. Each of these items can be removed or replaced by any other items.
Hint : See more item options, just set a breakpoint in
tableView:canPerformAction:forRowAtIndexPath:withSender:method and watchactionvariable.
Implement delegate methods:
- (BOOL)tableView:(UITableView *)tableView shouldShowMenuForRowAtIndexPath:(NSIndexPath *)indexPath;
- (BOOL)tableView:(UITableView *)tableView canPerformAction:(SEL)action forRowAtIndexPath:(NSIndexPath *)indexPath withSender:(id)sender;
- (void)tableView:(UITableView *)tableView performAction:(SEL)action forRowAtIndexPath:(NSIndexPath *)indexPath withSender:(id)sender;
First method decides whether the specified row can display menu, second determines what menu items can be displayed, and third one let table view know what to do after tapping on different item.
Advanced Usage
Dynamic Height of Table View Cell
Generally, each cell in the table view has it’s fixed height defined in storyboard or class file, like:

What if we want to display some text with uncertain content in a table view cell? The cell might have different hight with different text, so we need to set them independently. There are several ways to achieve that:
- Implement delegate method
- (CGFloat)tableView:(UITableView *)tableView heightForRowAtIndexPath:(NSIndexPath *)indexPath;
All you need to do is implementing this method and return cell height that related to each indexPath. It is allowed to do some calculation, so that you could add some Class methods in each custom Cell Class to calculate its height with a model and use here.
- AutoLayout calculation
After iOS 6, auto layout is recommended by Apple to create UI. They also increase the usability in this respect (Dynamic cell height).
Provided that you want to realize a situation - dynamically changing during inputing, there is an easy way to do it with a new variable - UITableViewAutomaticDimension (iOS 8 and later). Return this value (actually it’s a float value) in heightForRowAtIndexPath, heightForHeaderInSection or heightForFooterInSection methods, the table view would use a height which fits the corresponding delegate method like titleForHeaderInSection.
Generally speaking, it can be regarded as a placeholder for cell height, once this value is returned, table view will use auto layout to calculate the actual content height of views in cell.
There is a tutorial talking about how to create such dynamically changing cell, click here to see detail.